Every once in a while, you will hear a few photographers claim that lens filters are usually completely useless. Some will believe only specific types of filters for example UV and protective filters are usually evil, while others will also include polarizing and ND filters into the combine, claiming that one could reproduce the effects of those filters in post-processing software. Fights for or against filters may spark a lot of heated debates within the photography community, similar to topics like “ Nikon vs Canon”, or even “ DSLR vs Mirrorless”. You can find certainly some passionate individuals on the market who are ready to stand their floor no matter what. And there is nothing wrong with this, as that’ s what generally happens when there is truth on both part of the coin, depending on what position you are looking at – there are certainly each pros and cons to using lens filter systems. Having been teaching photography for a number of yrs now, I have come across many different professional photographers of all skill levels in the field and am have come to realize that there is sadly a great deal of misinformation out there regarding lens filter systems and their proper use. A lot of us simply don’ t know sufficient about not just filters themselves, but additionally their significant effect on our post-processing workflow. Although we have previously created many articles on lens filters , let’ s explore filters once again plus hopefully address some of the misconceptions regarding these important tools.
Polarizing Filter
The circular polarizing filter is a must-have tool for landscape and structures photographers, because it does some issues that software can never replicate. If you take side by side with a pro who knows exactly what he/she is doing, you will see that they consistently carry one or more polarizing filter within their bag at all times. So what is the usage of a polarizing filter and the reason why would anyone need it? If you have been convinced that a polarizing filter is only required to make the sky bluer, you certainly require some help in understanding their major role. When I teach workshops, the very first thing I point out, is that a polarizing filter is NOT designed for the purpose of deepening the sky. It is one of the results and in fact, often an unwanted one! When using wide angle lens, one could screw up the sky by causing one part of it appear a lot darker than the other, as noticed below:
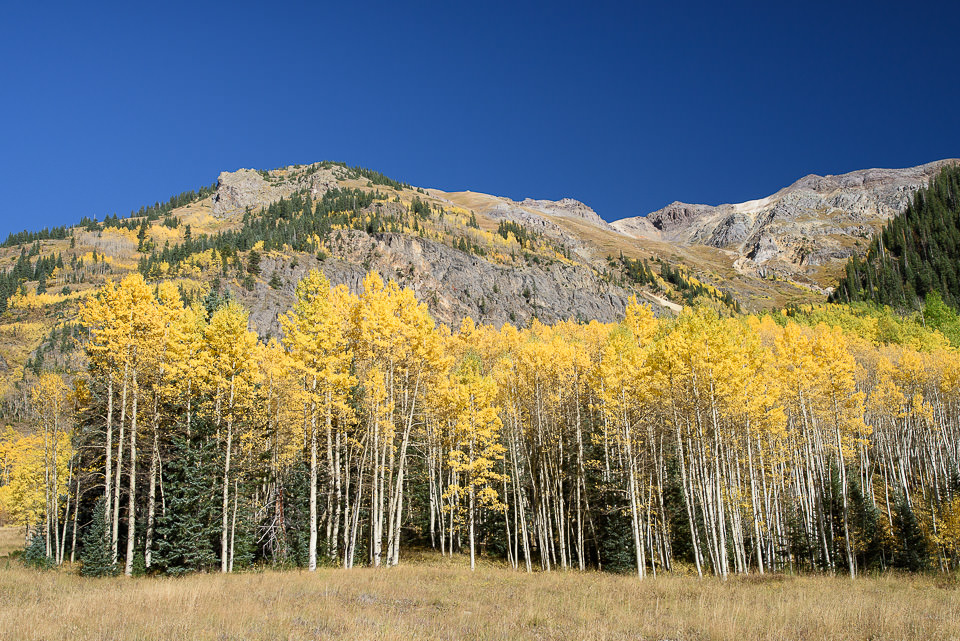
And when a zoom lens is pointed at a point associated with maximum level of polarization , the sky can change unnaturally dark, as seen beneath:
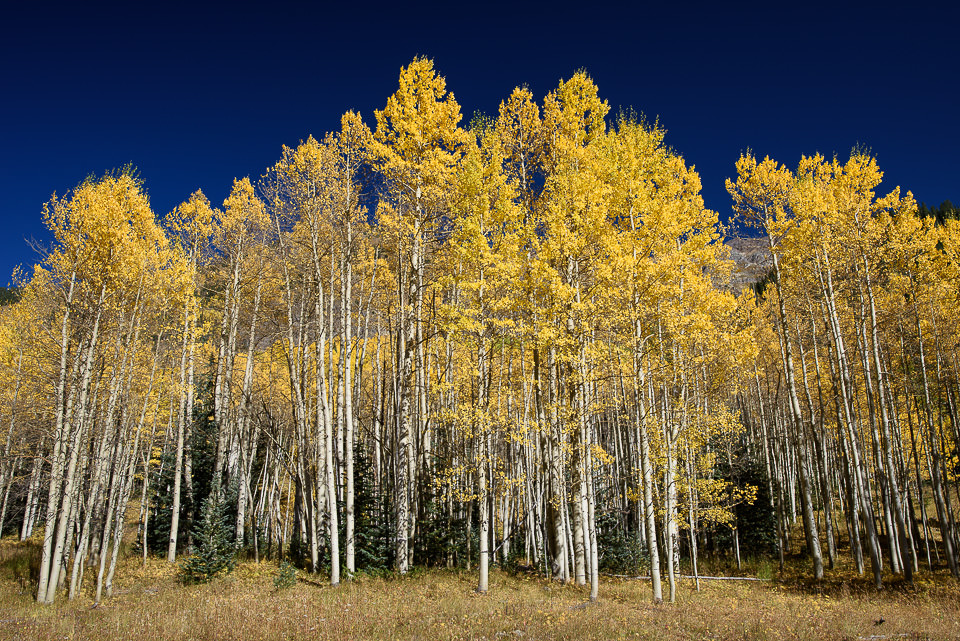
Hence, one have to know how to properly use a polarizing filtration system to avoid such strange effects upon images.
Does this particular make the polarizing filter useless? Obviously not. In fact , I will not keep my house to photograph landscapes with out one in my bag – that’ s how valuable a polarizing filter is for me! My primary purpose for utilizing a polarizing filter is to reduce haze . As you may already know, haze could be really difficult to deal with. When photographing faraway landscapes, haze is a very common event. It can happen due to humidity, air pollution, dust and smoke presence up, which all reflect sun rays back to the camera, resulting in reduced comparison. It can happen any time during the day, actually during the golden hours.
Polarizing filters, first and foremost, are created to reduce reflections. Simply by reducing direct reflections (which is definitely achieved by finding the right angle through revolving the front element of a polarizing filter), one can effectively reduce and sometimes even totally eliminate such atmospheric reflections.
Let’ s take a look at a few images that I quickly grabbed through my Lightroom catalog:
Looking at these two images, you will quickly realize that there is a dramatic distinction between the two images. Both are usually “ as is, straight out of the camera”, which means, I did not apply any post-processing to them. The “ Before” picture is the one I captured just before mounting a polarizing filter as well as the “ After” image was taken with a polarizer attached and rotated and balanced to reduce the reflections in the picture. As you can see, there are huge differences through the entire image. First, the image with the polarizing filter has significantly less haze within the distant mountains. Second, take a look at the particular colorful areas of the image – the particular reds and the yellows appear a lot more saturated. Also note how the evergreens appear completely different, looking greener plus lighter in comparison. This is all the consequence of reduced direct reflections. Without a polarizing filter, the greens appear “ dirty”, giving evergreens a much more dark and uglier tone. Lastly, notice the difference in the sky – the atmosphere appear to pop out much more as well as the sky looks a bit more saturated plus darker. This is all the result of reducing the reflections, something you could never ever reproduce in post.
The only downside here is the uneven skies introduced by the polarizer, but with a few good techniques in software, I could tackle such problems very easily.
Now one could argue that with great post-processing skills, it would be possible in order to simulate the effects of a polarizing filtration system. And to those who bring up this point, our argument would be that I have a far better starting point to work with in comparison. With only a couple of adjustments in Lightroom, which required no more than a minute, I was able to create my image look even better:
All I did so was even out the sky along with two GND filters, adjust digital camera profile, add a bit more contrast and some minor tweaks here and there. I cannot also imagine trying to adjust all the colours selectively in my image. It would get me hours of work in Photoshop and I can guarantee that the result may not even be close.
And this is just one sample picture. I could showcase hundreds of images, which may not have been possible without a polarizing filter. For example , when photographing waterfalls, a polarizing filter is an essential tool. I would love to see somebody recreate the following photograph without a polarizing filter:
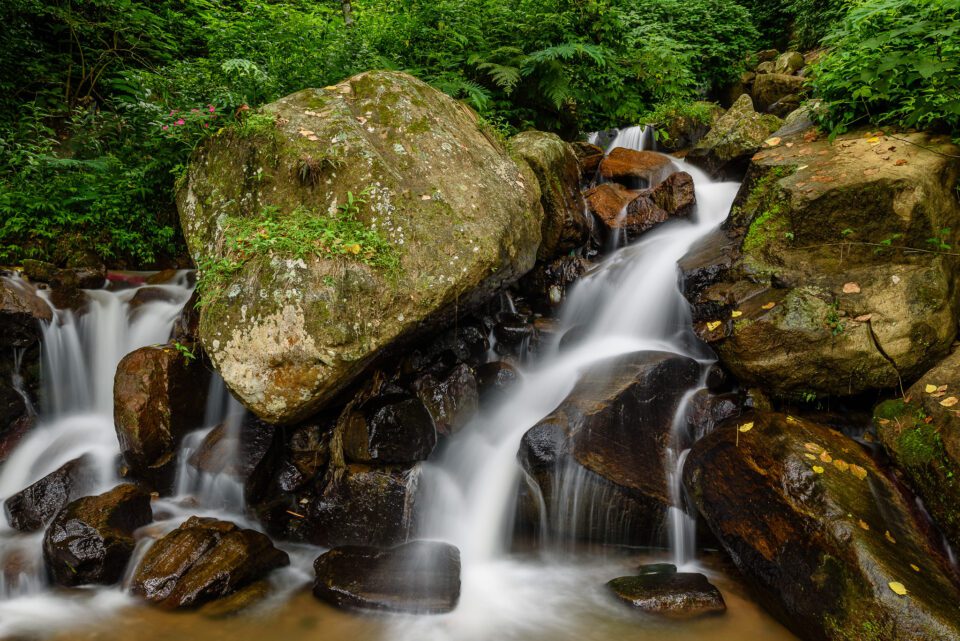
When photographing waterfalls, you cope with highly reflective rocks, since they possess water and other wet vegetation with them, all of which send nasty reflections directly into your camera. A polarizing filtration system makes a huge difference in such situations, not just significantly cutting down on those reflections, but additionally increasing the overall saturation and comparison of the image.
To put it briefly, it is impossible to simulate the result of a polarizing filter using software program!
ND and GND Filters
Other filter systems that are impossible to simulate within post-processing are Neutral Density (ND) and Graduated Neutral Density (GND) filters. ND filters are often required when photographing with fast primes in daylight. When shooting open at f/1. 4, the amount of lighting entering into the lens can be an excessive amount of for the camera to handle, maxing out there the shutter speed. If a good ND filter is not used, the will be blown out, which is unattainable to recover in post. And if 1 uses flash in such conditions, much more matters even worse.
One more case is using ND filters meant for slowing down the shutter speed. Occasionally one might want to intentionally blur quick action by “ dragging” the particular shutter, or perhaps slow things straight down dramatically to make them disappear or even appear smooth-looking.
For that earlier image of the waterfall, I had fashioned to decrease my ISO to fifty with the polarizing filter, which offered me a shutter speed of five seconds. If I wanted to increase the direct exposure duration even further for long exposure photography , my only option would be to how to use ND filter.
Today one could argue that capturing a sequence associated with images, then stacking them within Photoshop could result in a similar image, yet I disagree for two reasons. 1st, how much time, storage and hard work would I have to waste by starting a bunch of RAW files and putting them to produce a single TIFF document that I can no longer edit like UNCOOKED afterwards? All I have to do is definitely use a single filter, which requires 30 seconds to mount and am end up with a single exposure that works. Having a filter, I could even take a couple of shots and stitch a vistas with massive resolution – best of luck trying to do that with a few 100 stacked images – that simply sounds ridiculous to me. Second, the consequence of using a single exposure vs a crowd of stacked images is never the same. When doing long exposures, I could use different techniques, like partially blocking one area of the picture to reduce its brightness, in order to produce the results I need. With the image series technique, there is also more potential for digital camera shake. Why go through all this trouble if you can do it all right in the digital camera?

In other cases whenever panning motion, one needs to use gradual shutter speeds, which can be problematic to attain on a bright and sunny day time, particularly at wider apertures. Whilst decreasing ISO to the lowest amount and stopping down the lens are excellent options, using an ND filter would certainly simplify the task by cutting down the quantity of light entering through the lens.
And I won’ t actually go into the details on why GND filter systems are so valuable. If you are one of those professional photographers who thinks that “ HDR can save it all”, good luck! The web is already full of over-saturated HDR pictures with zero contrast and your efforts to “ Grunge HDR” will most likely welcome you to a few local digital photography clubs with other HDR maniacs. In every seriousness, and not that I have everything against HDR (ahem, ahem), before getting stuck in that HDR hole , please spend some time to learn how to properly use GND filters. Your camera has a lot dynamic range, that if you few it with GND filters, you are able to yield beautiful images that do not really scream “ unnatural” to your supporters.
UV / Defensive Filters
Let’ ersus get UV filters out of the method – indeed, unless you are using a movie camera, they are completely useless for that task of blocking UV. That’ s already done by your messf¨¹hler filter stack, which contains an ULTRAVIOLET blocking filter. Today, UV filter systems are only used as “ protective” filters, for the purpose of protecting your lens against damage.
Are usually protective filters necessary? It depends. Pertaining to photographers who take a good care of the gear and who rarely take in tough conditions, protective filter systems are probably not needed. However , I personally use safety filters on all of my lens. Why? Because I shoot in most kinds of conditions, which can be quite harming to gear. If you have never photo in sandy environments, you probably never have experienced sand scratching the front component of the lens when you try to thoroughly clean it. I have shot in a number of really “ sandy” locations like the Excellent Sand Dunes NP, Death Area NP and White Sands NM and I have seen what sand can perform to equipment. Similar to diamonds, fine sand can grind through pretty much any type of glass, even very tough “ guerrilla” glass we see upon high-end devices today. So possessing a protective filter really helps in this kind of environments, because a piece of $80 cup is far cheaper to replace in comparison with a $2K pro-level lens.
And I don’ t take action for protection reasons – a lot of lenses have round front components, which can be really tough to clean. In some cases, front side element of a lens is seriously recessed inside the barrel (such since the Nikkor 50mm f/1. 8G ), which makes them really hard to clean! Attaching a filtration system on such a lens can save lots of time in the field. So for me personally, it really is insurance + convenience.
Now some photographers will believe damaged front elements do not damage images. It is true, but it once again depends on what you photograph! A zoom lens with a scratched front element may not lose its resolving power, nevertheless overall contrast and ghosting + flare performance might diminish, particularly if there are many deep cuts. And it also causes harm to the resale value of a zoom lens – very few people want to buy lens with scratched up front elements.
Others will say that defensive filters reduce image quality, this is why they advocate against using them. Once again, it depends! If we are dealing with inexpensive, low-quality filters, then the statement is totally true! However , if one utilizes high-quality filters, there is zero destruction of image quality. In fact , I had provided a study before, which shows the effect of using poor-quality vs high-quality filter systems . Another interesting study particularly addressed the result of lens filters on the solving power of lenses . From this article you can see from both studies, if you use top quality lens filters, you have nothing to consider!
Now this does not mean which i always leave protective filters upon my lenses. In some situations (such as when including a vivid source of light such as the sun within the frame), I typically remove most of filters, as they can potentially add a lot more flare plus ghosting to pictures.
Hope the above write-up addresses some of the questions you might have upon lens filters. If you need additional information upon lens filters, please see our own detailed zoom lens filters explained post. If you are wondering about what filters to obtain for landscape photography, see this article .